KNN分类器入门案例
K最近邻(K-Nearest Neighbors,KNN)
加载CIFAR-10数据集
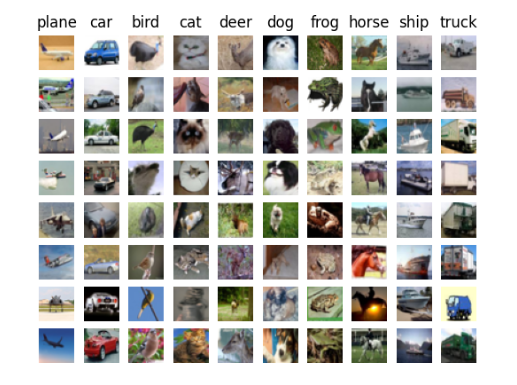
CIFAR-10, Canadian Institute for Advanced Research - 10, 是一个由加拿大高级研究院(Canadian Institute for Advanced Research)创建的图像分类数据集。它包含来自10个不同类别的60,000个32x32彩色图像,每个类别包含6,000个图像。
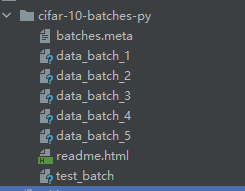
将下载的cifar-10-python.tar.gz文件解压到:/CONTENT/cs231n/datasets/cifar-10-batches-py,其文件列表如图:
这里和下文的/CONTENT目录一律指代根目录,实际可以是任意目录名称,data_batch_*是训练数据集,test_batch是测试数据集
加载数据集
xdef load_CIFAR10(ROOT):#加载训练数据集xs = []ys = []#加载训练数据集for b in range(1, 6):f = os.path.join(ROOT, 'data_batch_%d' % (b,))X, Y = load_CIFAR_batch(f)xs.append(X)ys.append(Y)#xs是1一个长度=5的list, 每个元素是shape=(10000,32,32,3)的np数组#Xtr通过np.concatenate函数(默认axis=0, 按行连接)连接xs,合成1个shape=(50000, 32,32,3)的np数组Xtr = np.concatenate(xs)#ys也是1一个长度=5的list, 每个元素是shape=(10000,)的np数组#Ytr通过np.concatenate函数,合成1个shape=(50000,)的np数组Ytr = np.concatenate(ys)del X, Y#加载测试数据集,同上Xte, Yte = load_CIFAR_batch(os.path.join(ROOT, 'test_batch'))return Xtr, Ytr, Xte, Ytedef load_CIFAR_batch(filename):""" load single batch of cifar """with open(filename, 'rb') as f:datadict = load_pickle(f)X = datadict['data']Y = datadict['labels']# X的原始形状为(10000,3072)# X.reshape(10000, 3, 32, 32),这段表示将X的形状修改为(10000,3,32,32), 分别对应(样本数量,通道数,高度,宽度)# transpose(0,2,3,1).astype("float"), 这段则表示将(样本数量,通道数,高度,宽度)顺序排列的数组转置为(样本数量,高度,宽度, 通道数), 这也是一般深度学习存储图像的顺序# .astype("float") 则表示转置后数组的每个元素以浮点数表示X = X.reshape(10000, 3, 32, 32).transpose(0, 2, 3, 1).astype("float")# 将Y转成numpy数组,Y的原始类型是listY = np.array(Y)return X, Y测试:
xxxxxxxxxxcifar10_dir = 'cs231n/datasets/cifar-10-batches-py'X_train, y_train, X_test, y_test = load_CIFAR10(cifar10_dir)print('Training data shape: ', X_train.shape)print('Training labels shape: ', y_train.shape)print('Test data shape: ', X_test.shape)print('Test labels shape: ', y_test.shape)xxxxxxxxxxTraining data shape: (50000, 32, 32, 3)Training labels shape: (50000,)Test data shape: (10000, 32, 32, 3)Test labels shape: (10000,)展示加载的数据集
随机选取一部分,使用plot图表展示
xxxxxxxxxxdef showdata(X_train, y_train):#标签项对应的序号,0:飞机(plane), 1:汽车(car)...9:卡车classes = ['plane', 'car', 'bird', 'cat', 'deer', 'dog', 'frog', 'horse', 'ship', 'truck']num_classes = len(classes)#每种类别显示几张图samples_per_class = 8for y, cls in enumerate(classes):#筛选当前类别序号对应的标签索引#np.flatnonzero函数的本意是过滤掉np数组里非0元素(包括int,float的0值以及字符串)的索引,返回nparray,但它其实也可以按条件过滤,这里其实就是用于这种场景,容易引起歧义,因此使用np.where替代#idxs = np.flatnonzero(y_train == y)idxs = np.where(y_train == y)[0]#从标签索引中,随机选取samples_per_class个idxs = np.random.choice(idxs, samples_per_class, replace=False)#将标签索引对应的图像按顺序显示到pltfor i, idx in enumerate(idxs):plt_idx = i * num_classes + y + 1plt.subplot(samples_per_class, num_classes, plt_idx)plt.imshow(X_train[idx].astype('uint8'))plt.axis('off')if i == 0:plt.title(cls)plt.show()测试:
xxxxxxxxxxshowdata(X_train, y_train)
数据集二次采样
这里为了演示,从训练数据和测试数据分别抽取一部分样本,实际训练一般需要全部样本
xxxxxxxxxx# 对数据集二次采样,以提高代码执行效率 (即从训练数据和测试数据中抽取一部分数据用于代码演示)def subsample(X_train, y_train, X_test, y_test, num_training, num_test): mask = list(range(num_training)) X_train = X_train[mask] y_train = y_train[mask] mask = list(range(num_test)) X_test = X_test[mask] y_test = y_test[mask] # 将(num_training, 32, 32, 3)的numpy数组,展平为(num_training, xxx)的二维数组,以便后续输入 # np.reshape(a, newshape) 函数用于将数组a重新转换为newshape的形状, 而这里newshape = (X_train.shape[0], -1), 即新数组的形状为(num_training, 自动计算) (X_train.shape[0] = num_training, -1表示自动计算) X_train = np.reshape(X_train, (X_train.shape[0], -1)) # X_test 同理 X_test = np.reshape(X_test, (X_test.shape[0], -1)) return X_train, y_train, X_test, y_test测试
xxxxxxxxxx#抽取5000个训练样本,500个测试样本num_training = 5000num_test = 500X_train, y_train, X_test, y_test = subsample(X_train, y_train, X_test, y_test, num_training, num_test)print('subsample Training data shape: ', X_train.shape)print('subsample Training labels shape: ', y_train.shape)print('subsampleTest data shape: ', X_test.shape)print('subsample Test labels shape: ', y_test.shape)xxxxxxxxxxsubsample Training data shape: (5000, 3072)subsample Training labels shape: (5000,)subsampleTest data shape: (500, 3072)subsample Test labels shape: (500,)使用KNN分类器分类数据集
xxxxxxxxxximport numpy as npclass KNearestNeighbor(object): def __init__(self): pass #训练KNN分类器,只是记住数据并且不做进一步的处理 def train(self, X, y): self.X_train = X self.y_train = y #推测输入项类别 def predict(self, X, k=1, num_loops=0): if num_loops == 0: dists = self.compute_distances_no_loops(X) elif num_loops == 1: dists = self.compute_distances_one_loop(X) elif num_loops == 2: dists = self.compute_distances_two_loops(X) else: raise ValueError('Invalid value %d for num_loops' % num_loops) return self.predict_labels(dists, k=k) #使用2层循环计算输入(测试)数据和所有训练数据的距离(L2距离) #np.square(X[i, :] - self.X_train[j, :],表示X[i]的每个元素(:表示i行的所有元素)跟X_train[j]的每个元素做减法,然后对每个减法结果求平方 #np.sum(xxx),表示前面对前面求得的每个平方求和, np.sqrt(xxx),表示对求得的平方和开根号 def compute_distances_two_loops(self, X): num_test = X.shape[0] num_train = self.X_train.shape[0] dists = np.zeros((num_test, num_train)) for i in range(num_test): for j in range(num_train): dists[i, j] = np.sqrt(np.sum(np.square(X[i, :] - self.X_train[j, :]))) return dists #使用1层循环计算输入(测试)数据和所有训练数据的距离(L2距离) #self.X_train - X[i, :]表示用X_train中每个元素跟X[i]的每个元素做减法,因为X_train的shape=(5000,3072),X[i]的shape=(3072,), 实际无法直接做减法,这个时候np会利用广播机制,将X[i]补全为shape=(5000,3072),即将X[i]的每行复制4999份,凑齐到跟X_train一致 #np.sum(xxx, axis=1)表示按列方向进行求和,因为xxx的shape=(5000,3072),所以sum的结果为(5000,1),又因为np求和的时候会自动去除长度=1的维度,因此最终结果的shape=(5000,),这样在对每个元素进行开平方(np.sqrt),就会得到X[i]跟X_train(5000,3072)每一行的L2距离 def compute_distances_one_loop(self, X): num_test = X.shape[0] num_train = self.X_train.shape[0] dists = np.zeros((num_test, num_train)) for i in range(num_test): dists[i, :] = np.sqrt(np.sum(np.square(self.X_train - X[i, :]), axis=1)) return dists #不使用循环计算输入(测试)数据和所有训练数据的距离(L2距离) # np.square(X).sum(1).reshape([-1, 1]) + np.square(self.X_train).sum(1).reshape([1, -1]) - 2 * X.dot(self.X_train.T) 其利用了平方差公式: (a-b)^2 = a^2+b^2-2ab #注意这里有几个细节: #1. np.square(X).sum(1).reshape([-1, 1]) 是把X每个元素平方后按列求和再reshape为列维度=1的np数组,其结果shape=(500,1) #2. np.square(self.X_train).sum(1).reshape([1, -1])是把X_train每个元素平方后按列求和再reshape为行维度=1的np数组,其结果shape=(1,5000), 经过这样的维度转换,就可以利用广播机制进行加法运算 #3.2 * X.dot(self.X_train.T), X和X_train无法直接进行乘法运算,因此这里对X_train进行了转置 def compute_distances_no_loops(self, X): dists = np.sqrt( np.square(X).sum(1).reshape([-1, 1]) + np.square(self.X_train).sum(1).reshape([1, -1]) - 2 * X.dot( self.X_train.T)) return dists #根据计算出的计算推测距离最近的k个数据 #dists[i, :]表示测试样本i与每个训练样本的距离, np.argsort(xxx)表示按距离从小到大排序,并返回对应的序号 #np.argsort(dists[i, :])[0:k]表示取距离最小的k个序号, self.y_train[knn]取得这些序号的标签项 #np.argmax(np.bincount(closest_y.astype(int))),从刚才选择的标签项数组中统计出现次数最多的标签项(np.argmax(np.bincount(xxx)), np.bincount(xxx)返回的是xxx内部各个数字出现的次数,它是1个np数组,其shape始终为(n,), n=xxx内部最大数字+1, 举个例子,np.bincount(np.array([1,3,3,6])),其shape=(7,), 结果为: [0, 1, 0, 2, 0, 0, 1] def predict_labels(self, dists, k=1): num_test = dists.shape[0] y_pred = np.zeros(num_test) for i in range(num_test): knn = np.argsort(dists[i, :])[0:k] labels = self.y_train[knn] closest_y = labels y_pred[i] = np.argmax(np.bincount(closest_y.astype(int))) return y_pred测试使用循环和不使用循环的执行效率
xxxxxxxxxxclassifier = KNearestNeighbor()classifier.train(X_train, y_train)#分别演示循环0,1,2次计算距离的效果for i in range(3):start = datetime.datetime.now()y_test_pred = classifier.predict(X_test, 1, i)# 打印准确度num_correct = np.sum(y_test_pred == y_test)accuracy = float(num_correct) / num_testend = datetime.datetime.now()sprint('Got %d / %d correct => accuracy: %f, cost: %i s.' % (num_correct, num_test, accuracy, (end - start).seconds))xxxxxxxxxxGot 137 / 500 correct => accuracy: 0.274000, cost: 0 s.Got 137 / 500 correct => accuracy: 0.274000, cost: 37 s.Got 137 / 500 correct => accuracy: 0.274000, cost: 26 s.可以看到得到同样的结果,不使用循环能明显提高计算速度,这是因为numpy对张量(可以理解为np数组)计算进行了大量优化,对它们的操作尽量不要使用循环执行。
测试不同k值对准确率的差异
xxxxxxxxxxfor k in range(10):start = datetime.datetime.now()y_test_pred = classifier.predict(X_test, (k + 1), 0)# 打印准确度num_correct = np.sum(y_test_pred == y_test)accuracy = float(num_correct) / num_testend = datetime.datetime.now()print('k: %d, Got %d / %d correct => accuracy: %f' % ((k + 1), num_correct, num_test, accuracy))xxxxxxxxxxk: 1, Got 137 / 500 correct => accuracy: 0.274000k: 2, Got 112 / 500 correct => accuracy: 0.224000k: 3, Got 136 / 500 correct => accuracy: 0.272000k: 4, Got 136 / 500 correct => accuracy: 0.272000k: 5, Got 139 / 500 correct => accuracy: 0.278000k: 6, Got 141 / 500 correct => accuracy: 0.282000k: 7, Got 137 / 500 correct => accuracy: 0.274000k: 8, Got 137 / 500 correct => accuracy: 0.274000k: 9, Got 134 / 500 correct => accuracy: 0.268000k: 10, Got 141 / 500 correct => accuracy: 0.282000可以看到,随着k的不同,准确率随之出现差异,这说明KNN分类k的选择不同会直接影响最终的预测准确率。
我们非常希望这篇文章能为你提供所需的帮助。你的反馈和建议对我们来说都是宝贵的资源。如果你有任何想法或问题,别犹豫,请在下方评论区留言。同时,如果你觉得这篇文章有用,欢迎分享给你的朋友们。你的参与促使我们前行,期待与你一起学习和成长。
如果这篇文章对您有帮助,也可以赞赏博主喝杯茶~


